Tuesday, December 24, 2013


I just wanted to wish everyone a very Merry Christmas and a Happy Holiday Season! May 2014 bring you nothing but great things!

Tuesday, December 17, 2013

Chocolate Boxes


I just finished making these cute little boxes to hold a Ghirardelli chocolate for my Christmas table place settings. They were super easy to make and I think they are adorable!


Step 1:  Using my Die-namics Pointsettia die I cut out a set of the large green leaves, 1 large red flower, 2 small red flowers, a small green centre and a yellow stamen.

Step 2:  Then using a pencil I rolled the leaves so that they would stand up a bit to add some dimension to the flower.

Step 3:  Glue the flower pieces together staggering the petals, add the centre and stamen. I used "Bisque"liquid pearls to add dimension to the stamen.

Step 4:  Cut out a piece of 5x5" paper of your choice. Using the We R Memory Makers Envelope Punch Board ( I used red card stock so you can see the lines easier, but when using the patterned paper put the side you want to show on the box face down. Score at the 2" line, and punch a hole


Step 5:  Move the paper over to the 2 5/8" mark score and punch.

Step 6 & 7:  Moving the paper counter clockwise, match up your score lines , punch and score

Step 8:  I'm just showing the "punch" part as I forgot to do it when I scored and had to go back and do it.


Step 9:  Using the corner punch on the envelope board round all 4 corners.

Step 10:  Using your scissors, cut out the "square" on each corner.

Step 11:  Using a bone folder pre-fold all the score lines. Put 2 strips of glue on one of the points.

Step 12:  Fold 2 edges in and then fold the edge with the glue strips adhering into place.


Step 13:  Put your Ghirardelli square in the box and secure the box closed. I used a sticker.

Step 14:  Lastly attach your leaves and poinsettia to the box. I used glue but a glue dot would work wonderfully!

These were so much fun to make! Hope you are enjoying all this snow we've been getting! It's hard to believe Christmas is only 1 week away! Wow times flies!
Chat at you later,
Cheri

Tuesday, December 10, 2013

Operation Christmas Child

Yesterday I had the opportunity to volunteer at the sorting facility for Operation Christmas Child. What an amazing and inspiring organization this is and their idea for the Christmas shoe boxes.


The idea behind the shoe boxes is that the boxes are filled by Canadians with hygiene items, school supplies, toys and candies and given to children regardless of gender, race or religion. What we did at the sorting facility was open up the boxes and check to make sure that they only contained items that are allowed to be shipped to these countries. I opened boxes from as far away as the east coast. What touched me the most was the thoughtfulness and love that "strangers" put into these boxes. So often we get caught up in the "buying" of Christmas that we forget the simple things and that not everyone is as fortunate as us. When you open a box and see it stuffed to the brim with items you know will make a child think they have died and gone to heaven just warms your heart. I can't even begin to describe how this experience touched me. Tim and I are going back on Saturday as I know he will be just as inspired as I was!
click the logo to go to their site 


I do know this….. I will be shopping throughout the coming year and stashing things away so that next season I can pack my own shoeboxes for a child in need.
Chat at you later,
Cheri

Monday, December 9, 2013

My Blog post went live!


Wow it feels so cool to see your work on a website! This is a  first for me and exciting. I took my first class at The Art Studio @ Scrapbook News and Review and wrote a post to promote the class. It's part of what I get to do being part of the focus group. Dena's online card class was fun and she is a great Instructor and her videos are easy to follow. You should head on over to The Art Studio and see all the great online classes they offer!


Click here. to view my post.  If you would like the see the class description click here and it will take you to the class posting.


Chat at you soon,
Cheri

Christmas Stocking


Whew finally got around to getting this post up for you to see. I forgot how busy it gets once December rolls around. I just finished taking a class at The Art Studio @ SNR (Scrapbook News and Review) where I am part of their focus group. I enjoyed the class and part of my focus group "job" is to promote the class on their blog.  I have submitted that and when it goes live I will let you know!


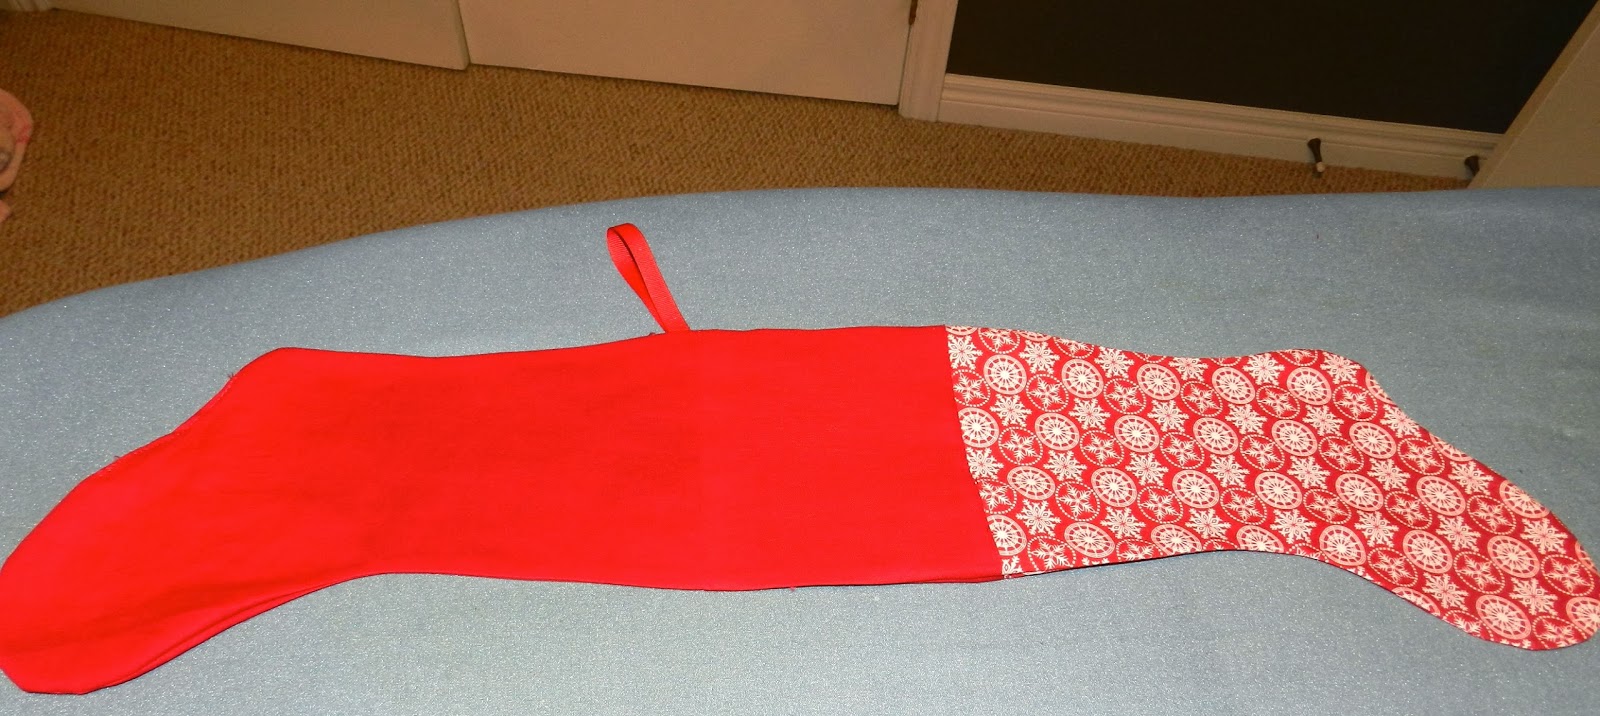
 Here is the stocking I made. I have to tell you that I am not a "sewer". I try my best and all I can say is I make lots of mistakes, but lots of love goes into everything I try to sew. I was pleased how the stocking turned out. It is not a full size stocking just big enough to put a few goodies in for fun. The finished stocking measures 10 " from the folded down cuff to the toe and about 5 1/2" wide at the broadest part of the stocking.


You will need: 
Patterned material of your choice
material for lining
matching thread
8" piece of ribbon
button if desired


 I made my own pattern, the stocking is on a piece of 8x11 paper. The cuff pattern measures 6x5. For the cuff I took the width of the top of the stocking 5" and then estimated approximately how long I wanted the cuff to fold over 3"and doubled that.


Cut:
2 Patterned pieces
2 lining pieces
2 cuff pieces


With the right sides together sew the cuff to the front of the stocking piece.


Pin the lining to the right side of the cuff, repeat the last 2 steps with the remaining pieces.


Next sew the cuff to the stocking and lining pieces. I used about 1/4" seem allowance


You should have something that looks like this.

Iron, pressing the seams towards the middle.

Pin the stocking pieces with right sides together. I had to trim a bit off them when they were pinned
together as my "cutting" skills don't always like to follow the pattern (LOL)


Take the piece of ribbon and fold it in half. Pin in-between your lining layer on the heel side and line it up where it would meet the cuff.  (The first time I did it wrong and had to rip out my stitches and re apply which is why this picture is sewn and trimmed just ignore that LOL)

 
Next sew around the stocking starting at the lining side sole. I used about 1/4" seam allowance.
Leave an opening so that you can turn the stocking inside out. Trim your seams. I used my pinking shears so that the curves would lay flat.


Turn your stocking right side out and sew up the opening on the lining foot. 
Press flat with your iron.


I then folded the stocking and pressed the top of the cuff .


Now stuff the lining into the patterned stocking piece. I used the pressed line as a guide
 when "stuffing" so I would know where to turn down the cuff.


Press your stocking flat and voila your stocking is done.


 Now I wanted to add names to my stockings. I bought and tried a white fabric paint pen and also a bottle of fabric paint. I wasn't happy with the results. The paint pen leaked through the cuff material and looked awful, and the tube, well lets just say it looked like a 4 year old printed the name. Since I am sewing challenged and did not want to try to applique letters on my stocking, I used white card stock, my cricut and cut out letters. I then used fabric glue and attached them to the stocking. Looks more professional but I won't be able to wash them.


Well hopefully you can understand my tutorial, if not email me and I will try to better explain it to you.
Gotta run I'm heading to volunteer at Operation Christmas Child for the afternoon! 
Chat at you later!
Cheri

Monday, December 2, 2013

Birthday Card.


I made this card for my Aunt's birthday today and she was quite thrilled with it. It is great when someone loves and appreciates the work you put into a special card for them!


To start I inked one of my favourite Magnolia images "Congratulation Tilda" with Memento ink on Copic Xpress-it card stock. Using my copics I coloured her hair, skin, present, bow and boots. I then stamped her image again on patterned paper and paper pieced her dress, socks and birthday hat.


I used a pre made 5 x 6 1/2" card. I used a base piece of pink card stock cut at 5x6 1/2". The next layer (yellow card stock) is cut at 4 7/8x 6 3/8". I cut the patterned paper at 4 3/4x 6 1/4".I cut a piece of white card stock at 4.5x 5.75" and then put in through my Cuttlebug using the Darice embossing folder called "ornate frame". I rounded the corners to give it a softer look. Using my spellbinders "Labels 18" set I cut  out shapes to use on the front and inside my card with the coordinating paper I already used. I ran the smaller yellow shape through the Cuttlebug using the Cuttlebug "dots" embossing folder. I inked all my edges with Tim Holtz distress ink in Antique Linen. Next assemble all your layers and glue to the pre made card. I love Beacon 3-1 glue as I find it dries flat no matter how much or little you use. To make the flowers I used the CC Designs "Curly-Q" border die. Using my quilling tool I rolled the curly-q border up making it into a flower and adhered to the card front with glue dots. I used the Wink of Stella clear pen to add some sparkle to the flower petals as well. I added some leaves, rhinestones, ribbon, bow and a small stamped sentiment. I added my Magnolia image using pop dots to add dimension to the card, and voila the card from was finished. 

I hope you can understand my instructions! Hopefully I will get the stocking post up soon for you to see! Chat at you soon,
Cheri


Thursday, November 28, 2013

I've been so busy!

Whew…… where does the time go? I've been wanting to get on here and "chat at you" sooner than this but life seems to somehow get in the way LOL. I have a sewing project to share with you and hope to get that posted sometime over the weekend as well as a birthday card I'm making for my Aunt. My dear sweet daughter Taylor is here to visit overnight and it's so nice to see her! We are going for manicures in the morning. Nothing like Mother -Daughter time! This weekend is busy as well. Tomorrow night we have a Guelph Storm hockey game to go to. We are season ticket holders and love to cheer on our team. Saturday we have a family Christmas party for my Dad's side of the family starting at 2pm and then in the evening we are going to see Pink in concert. I'm hoping to drag Hubby out Sunday to help with some Christmas shopping. Whew I'm tired already just thinking about it all LOL. Anyhow just wanted to say hi and touch base.
Chat at you later,
Cheri

Sunday, November 24, 2013

More Christmas Cards

Well here you go…. more Christmas cards. I love to colour stamped images with Copics. I'm not the best with them yet but I sure have fun trying to blend and shade. I think my favourite "character" stamps have to be the Magnolia images. I find them just adorable and use them whenever I can. I made these cards in the past month as well. I'm not going to list the supplies but if you have any questions about them, email me and I can fill you in on the details. I didn't show all the card insides this time either but know that I always add some sort of decoration to the inside of my cards. I think it really finishes them off.
I also searched youtube and found a video on making a light box to photograph my cards in, so hopefully they look a bit better than previous pictures.


There you go that's all I have finished for now. I hope you are enjoying my work!
Chat at you soon,
Cheri

Saturday, November 23, 2013

Christmas Cards


I made these cards about a month ago long before I ever even thought about blogging and showing my designs. So needless to say I don't have pictures of how they were made. I made them as "prototypes" for my Husband to choose which card he would like for his clients. Of course he loved them all (LOL) but choose the card I showed in my post dated November 18, 2013. I made 70 of those cards and now I will use some of these designs for our personal use. I'll try to list the supplies I used. This year I am using the same sentiment inside all my cards so that I will remember for next year (getting old & forgetful you know). The sentiment is from AMY R Stamps:Scripted Greetings & Fanciful Christmas Stamps.


 Supplies Used
Pre made 4x 5 1/2" card base 
Die-namics Pontsettia die
Liquid pearls (on flower middle)
Die-namics Oval dies
December Documented paper by Simple Stories
bows are from the Die-namics Spring Wreath die set
coordinating red & green card stock
rhinestones


Supplies Used
Pre made 4x 5 1/2" card base
Darice Snowflake Embossing Folder
Memory Box Frosted Christmas Tree
Impression Obsession Deer Trio
birds are from- Impression Obsession Birch Trees
Crystal Stickles
White, silver & red coordinating card stock


Supplies Used
Pre made 4x 5 1/2" card base
Carta Bella Merry Christmas & Holiday Wreaths Paper
Authentique Classic Paper
Green & Gold coordinating card stock
Die-namics Circle Stax dies
Die-namics Oval dies
Memory Box Classic Ornament Die
Memory Box Precious Snowflakes
Die-namics Let it Snowflakes

Supplies Used
5 x 6 1/2" Pre made card base
Memory Box Frostyville border die
Memory Box Drop Ornament
Memory Box Colette Ornament
Die-namics oval dies
Spellbinders Lacey Ovals
ribbon
liquid pearls


Supplies Used
Memory Box Frosted Christmas Tree
Cuttlebug Polka Dots embossing folder
Quickutz Let it Snow Embossing folder set (trees & Snowflakes)
Diamond Stickles
Navy, light blue& white card stock

Well there you go! I have more cards finished that I will try to get uploaded this week for you to see. Have a great weekend! Chat at you soon, Cheri.

Thursday, November 21, 2013

My Dogs!

Well it was hair cut day for the dogs. They were overdue and sure did need it done. Hopefully they will grow some hair back before the cold of winter really sets in. Ally is a black miniature/toy poodle and Buster is a morkie. Ally is 4 1/2 and Buster will be 2 years old on December 19th. They sure are great companions!
Before


After
 Don't they look absolutely adorable!!
Chat at you soon,
Cheri

Tuesday, November 19, 2013

Christmas Advent Calendars

So a few weekends ago I had my "children from another Mother"(my cousins' girls) overnight. We always like to do some sort of craft, usually card making. This time I planned an advent calendar. I think they turned out really fun, the girls did a  great job!
Katrina's Calendar (12 yrs old)

Ashley's Calendar (8 yrs old)


We started with a blank 16x20" artist canvas from the dollar store. The girls used red and green paint to cover the canvas. Katrina added tissue paper poinsettias with mode podge to her canvas. I had the boxes cut and scored before the girls arrived to save time. While the canvas dried we all got busy assembling the tiny boxes. The girls then decided where each patterned box would go and we hot glued them to the canvas. Using my cricut machine we cut out red and green numbers and glued those on as well. You can't see it but we stapled ribbon on the back of the canvas to hang the calendars on the wall with.The girls then used Christmas embellishments from my stash to decorate the boxes.

Did you notice that Ashley put her numbers in a random order so she would have to look for each day throughout her canvas. Katrina is like me and had to have hers in numerical order, we are related LOL!

I gave them each a baggie full of Lindt wrapped chocolates and hopefully they still have them left to fill the boxes with for the month of December.

We had a blast! Sure do love those girls!
Chat at you soon!
Cheri


Monday, November 18, 2013

Focus Group

I've been asked to be a member of  Scrapbook News and Review Magazine Focus Group. I am very excited to become a part of their team. It means I get to take at least 2 classes a month and give my feed back on them. I'm a bit nervous as I am so new to all this stuff, reviewing, blogging etc. but I am thrilled to be part of their Focus Group! I always like a new challenge and spending time crafting is never a bad thing!! I'll let you know when my review goes live on their site!

That's all the news for today!
Cheri

Christmas card

Well I spent the better part of today working on the Christmas cards for my Husband's clients. I am still not quite finished but I did take pictures and can now post a card so you can see my work.


I really enjoyed making this card. I can't take credit for the design of this card as I saw something like it on Pinterest. I loved it so much that I decided to give it a try. It's different for me as I usually use a stamped image and either paper piece or colour the image with Copic markers. I enjoyed making it all from dies using my cuttlebug machine. It was a bit finicky with all the intricate details in the cuts but I think it turned out beautiful.


 I used a pre made 4"x 5 1/2"card with matching envelope. I cut the blue paper at 3 7/8"x 5 3/8", the white paper at 3 6/8"x 5 1/4 ". The strip cut at 2"x 5 1/4" is used to die cut the snowflake border.The paper is from the Michaels and has a nice shimmery shine to it.


Using the strip of white paper I cut the snowflake border out and glued it to the left side of the white rectangular piece. I then used the ornament die and cut out the shape on the card front.


Glue the white card front to the blue backing, then glue the die cut ornament back into the shape opening. I used the ornament top from the memory box die ornament cut in blue and the bow from the memory box die snowflakes in white. Adhere those to the card as well. I added a few rhinestones for extra bling.


For the inside of my card I kept it simple and just stamped a sentiment and added a snowflake punched border.

Supplies Used:
Recollection Card stock in blue and white
Memory Box Precious Snowflakes Die(98729)
Memory Box Snowflake Ornament Die(98231)
Memory Box Classic Ornament Die( 98211)
Memory Box Frostyville Border Die (98146)
Recollection Snowflake Border Punch
Rhinestones from Dollar Store

Back to the craft room now to finish the rest of the cards, 69 more to go LOL. Hope you have a great day! Chat at you soon!
Cheri