Monday, March 31, 2014

Another Easter Card

After finishing the Easter cards for my Hubby, I had a few Copic coloured Tilda images left. I decided to make a few more cards for family & friends. The first card I am going to show you fits into a few Card Challenges, so I'll be entering it into them. Check out the links to their sites and see all the beautiful cards entered into their challenges.

I am entering this card into:


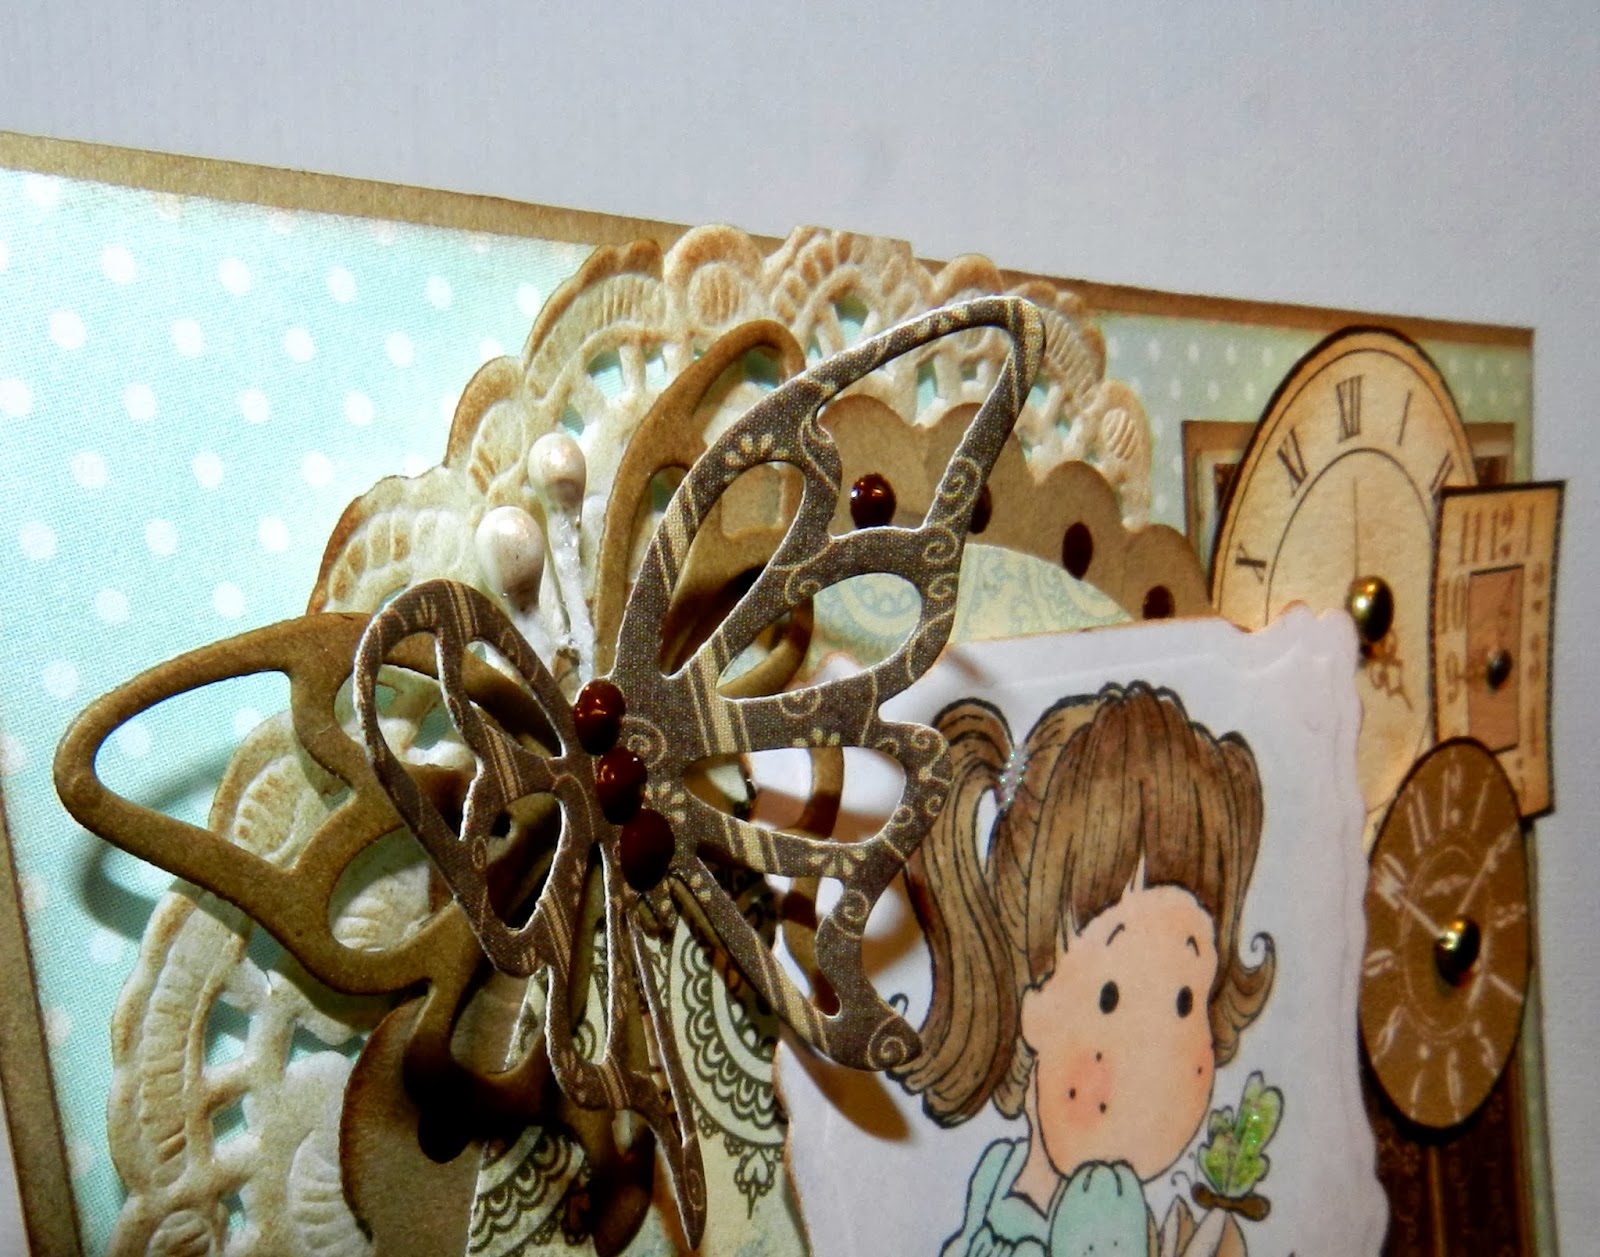
Once again I used paper from the Bo Bunny Primrose line. It's my favourite go to paper right now. I inked all my edges using Tim Holtz Distress ink in Vintage Photo. I made the roses myself from MFT die-namics Mini Rolled Roses die and added a coloured pearl to the middle of each one. I layered 2 green Die-namics "Leaf Filled Flourishs" on top of a Bo Bunny Dollie and then added some pink "Macarena Corner" die cuts from Memory Box. I added the roses and then using 3 shades of green, I  cut out leaves using Martha Stewart's "Frond" punch and added them to the roses. I put a Die-namics "Vintage Flourish" die cut on the top and bottom of my stamped image. Using Crystal Stickles I added some glitter to Tilda's hat and the bunny tail. I added some pearls from my stash, a small sentiment, decorated the inside and voila the card was done.


Here's a couple more I made using the same Magnolia image!

Hope you are enjoying the spring weather we are finally getting! Now if all the piles of snow would just finally melt it would feel like spring!
Chat at you later,
Cheri


A Baby Boy!

A colleague of my Husband welcomed a new baby boy into their home. Congratulations to Grant and Ashley on the safe arrival of Bryce! I made this card to go with the gift we bought for their new baby.


Supplies Used:


pre-made card base 5.5" x 5.5"
Blue & yellow card stock
paper from Doodlebug's "Snips & Snails" 6x6 pad
C.C. Designs Baby Boy rubber stamp
memento tuxedo black ink
Light blue ribbon
Die-namics Oval Set 1 Die
Die-namics Oval Set 2 Die
Die-namics Party Banner Die
Die-namics Fishtail Flags
Die-namics Chevron Strips
Amy R Welcome Little One Sentiment stamps
Diamond Stickles
Liquid Pearls in Baby Blue
Hero Arts alphabet stamps


I stamped the image onto Copic Paper and coloured it with the following Copic markers.
Skin: E000, E00, E01
Hair: E43, E44, E47
Sleeper: B91, B93, B95
Bottle: B0000, W0
Blocks: B000, Y000, Y13, Y93

Grant and everyone at Hubby's office loved the card! Always glad to hear that!
Chat at you later,
Cheri

Sunday, March 30, 2014

Whew, Finally Finished!


Today I finally finished the 75 cards that I was working on for Easter that my Husband will send out to his clients. He personally signs each one so that's his job this week in the evening after supper. A shout out to my Mom for coming over on Friday and helping "glue" things together. Thanks Mom!


As you can see I've used the same Magnolia stamp "Tilda and Her Bunny" that I've used in an earlier post, as well as paper from the Bo Bunny line called Primrose. They are my go to choices it seems for this Easter! Hope everyone had a great weekend!
Chat at you later,
Cheri


Thursday, March 27, 2014

Spring?

Spring where are you? It's still cold here and I wonder if Mother Nature forgot about us?! I designed this Easter card to try to feel inspired that the warm weather is truly on the way. Easter always reminds me of warmer weather, spring flowers, baby animals, pastel shades and plants starting to push their way out of the soil.

I decided to enter this card in the following blog challenges:
1.  Tilda's Town : Challenge  #97 Spring
2.  Stamp and Create with Magnolia: Butterfly Challenge
3. Kit and Clowder: Wings Challenge
4. 7 Kids Challenge Blog: Anything Goes Challenge

Make sure you click on the links and head on over to their blogs to see all the beautiful work crafters have submitted to the challenges!

Now off to try to do some work in my Art Journal. Think Spring and sunshine!
Chat at you later,
Cheri

Monday, March 24, 2014

Birthday Card


I made this card for my best friends Husband's birthday. As you can see he turned 42, still way younger than me!

 I've finally finished colouring the images for the Easter cards and now just have to assemble them all. Mom to the rescue! She's coming over later this week to help me. I've been dabbling in my art journal trying out some more mixed media projects. I just love doing all the layers and different techniques. Tomorrow spending the day with my "bestie" and I'm really looking forward to that. Have a good night all!
Chat at you later,
Cheri

Wednesday, March 19, 2014

Cute & Simple Cards

I had time today to get out my Simon Says Stamp March Monthly Card Kit. It's a cute card kit and I kept the cards bright and simple.


 Here's what came in the monthly card kit.


I've been busy colouring the 75 images for my Easter cards that my Hubby sends to his clients. I have 5 left to do, WOOOOHOOOOO! Then my dear Mom is coming on Monday to help me glue everything together. She loves to help and I sure do appreciate it! Have a great day everyone!
Chat at you later,
Cheri


Monday, March 17, 2014

Mixed Media

I thought I'd try my hand at a mixed media project. I've been looking at so many online and different artist's art journals and they have inspired me to give it a try.


I had a thick piece of cardboard so I decided to use that. First I covered it with 2 coats of Gesso and after that was dried I used some of my Tim Holtz Distress Stains to add a base of colour. Then using some stencils and my Adirondack Color Wash sprays, I laid another layer down onto the cardboard. I cut some hearts and flowers out of music patterned paper and using Modge Podge applied those. I then took Faber Castell Gelatos and coloured the flowers and hearts and outlined them using a thin paintbrush and some of the colour wash spray. I coloured some Molding paste with acrylic craft paint and using a stencil added the butterflies. Then onto stamping patterns onto the canvas and the butterflies with different stamps from my stash. I also took a gold Acrylic paint dabber and stencilled on some flowers. I think it turned out sort of cool. Not quite like the perfectionist in me thinks it should have though LOL! I picture mine turning out like some of the artist's I follow but hey they have years of experience! All in all it sure was fun layering it all and getting my fingers dirty in the process!
Happy St. Patty's day and I'll chat at you later!
Cheri 

Tuesday, March 11, 2014

30 Done!

Just thought I'd let you know what I am working on at the moment. I've been really working hard on the 75 cards I am making for my Husband's clients for Easter. I've got everything cut out finally. 150 butterflies, whew….that took a bit of time. Now I am colouring, colouring and colouring. I have 30 girls coloured with 45 more to go LOL. I am not the fastest person when colouring so it's been taking a while. Good thing I started early!


I am in love with the New line from Bo Bunny called Primrose. The colour scheme is so pretty all pastels in pinks, browns and mint. The cards will be so cute and spring like and I know I will be proud to send them out. So that's what I've been doing, what about you?
Chat at you soon,
Cheri

Monday, March 10, 2014

Onion Envelope


I recently found an online class by Virginia Nebel titled “Onion Envelope Workshop”. It’s a mini album of sorts that “peels” away layer by layer to hold all your special memories. The best part is that it will fit into a standard size envelope to mail to that someone special. I thought I would give it a whirl for something different to try. I had so much fun putting my envelope together and actually got carried away with decorating it. I created a Paris theme with my envelope and it can hold 13 pictures of various sizes. 


The instructions were very easy to follow and I know I'll be making another one soon! Hope everyone is doing well and enjoying this warmer weather we've been having!
Chat at you soon!
Cheri


Monday, March 3, 2014

Birthday Wishes

I was busy today working on the Easter cards for my Husband's clients when I decided I needed to take a break. I decided to try to enter some more challenges and came up with this design.


This card falls under the requirements for a few challenges this week/month at various blogs, and I am excited to enter it and see what happens. Don't forget to click the links below to check out the Challenges at these blogs, I know they would love for you to have a look.
  • At Simply Magnolia the challenge is to use Kraft paper and incorporate 2 more colours along with of course a Magnolia Stamp. I used the Kraft paper to layer under my patterned paper, one of the butterflies and the border around the circle piece. My two colours are a darker brown and a minty blue. 
  • At Tilda's Town Challenge #94 is to use things from your stash which of course was no problem as let me tell you….I have a big stash of stuff that I have accumulated LOL! 
  • Stamp and Create with Magnolia's challenge #26 is to use a birthday theme and magnolia stamp. 
  • Anything goes at the Marvelous Magnolia Challenge #62, so this card works well for their challenge as well. 
  • At Simon Says Stamp Monday Challenge the theme is Tick Tock. The design is to be anything time inspired. 
  • 7 Kids College Fund Challenge #94 is anything goes and to use a stamped image that they carry in their store.
  • Kit and Clowder's Challenge for March is Wings. So as I have butterflies on my card I figure I got the "wings" thing covered.
Here's the items I used to create my card.

Kraft Card stock (my stash)
light blue card stock (my stash)
Fancy Pants "Summer's End" 6x6 paper pad
Bazzill Basics Paper 6x6 "Timeless" paper pad
Magnolia Stamp: Hello Little Butterfly
Memento Tuxedo Black ink
Hampton Arts Rust ink pad
Brown ribbon (my stash)
Bow Easy
Pop dots from The sticky Stuff Store
Liquid Pearls: Bisque
Stickles: Crystal
Viva Pearl Pen: Dark Brown


Hero Arts: Clear Design Bird Branch Alphabet
Echo Park "Dots & Stripes" 6x6 paper pad
Tim Holtz Distress Ink: Vintage Photo
Brads (from my stash)
Happy Birthday Stamp from Paper Smooches "Sentiment Sampler"
Die-namics Circle Stax2
Spellbinders: Opulent Ovals
Spellbinders: Labels 29
C.C. Designs Butterlies Die

Face: E000, E00, E01 R20
Hair: E43, E44, E47
Dress: G0000, G000, G00, G02
Bow &Boots: E40, E41, E42, E43
Butterfly: G00, G02
Ground Shadow: E40, E41, E43
Image Shadow: B0000


Whew, that was a long entry LOL. Hope you are keeping warm, spring is coming soon (I hope).
Take care and chat at you soon!
Cheri