Tuesday, October 30, 2018

All Things Gold!

Happy Tuesday HH & OCS Fans!
Today I am sharing with you a gold themed card! There is just something about the colour gold that makes everything seem more elegant!
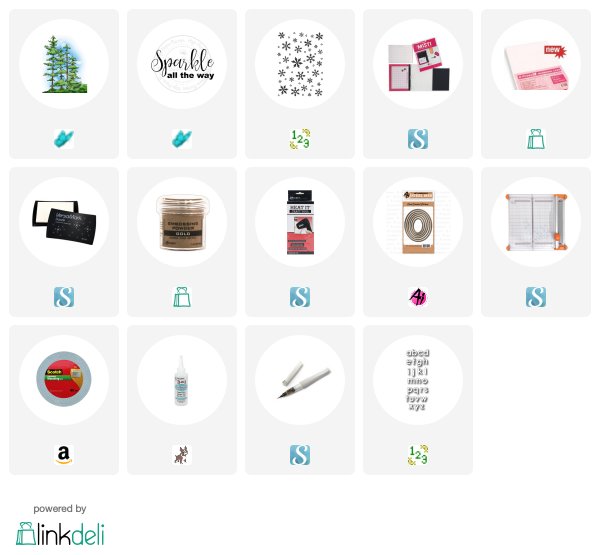
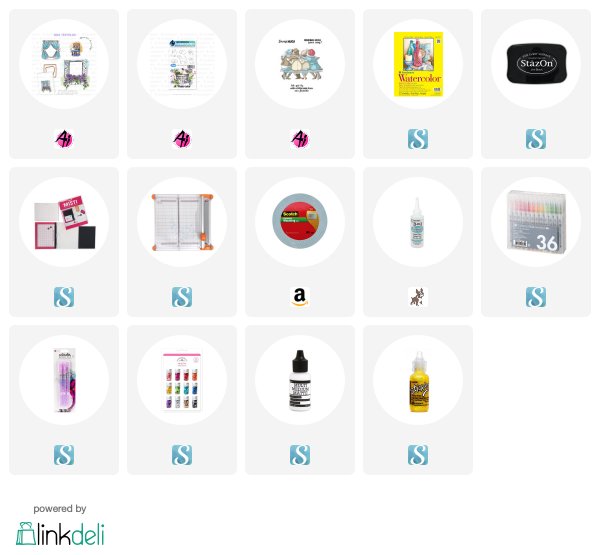
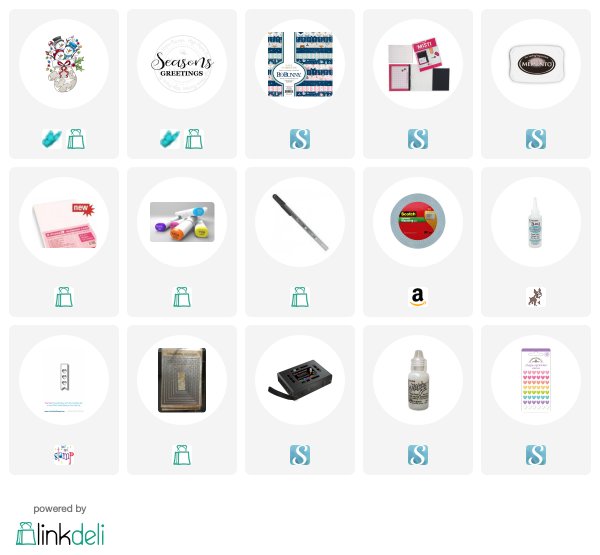
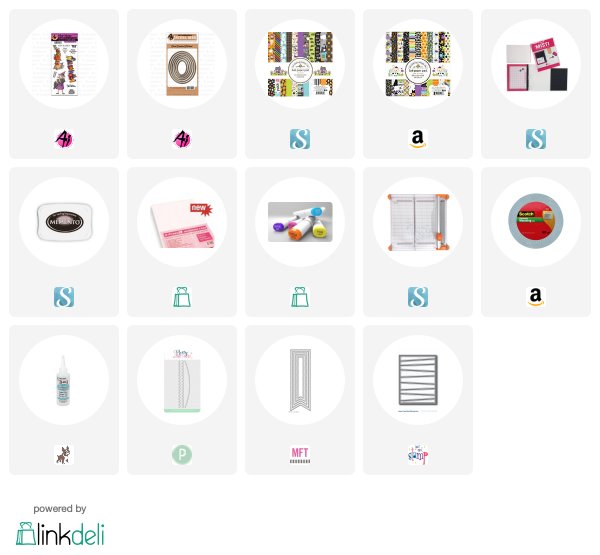
I was trying to think of a way to share this High Hopes image called "Forest" that would be different than my normal Copic colouring. Then.........boom it hit me.....GOLD! I stamped my image with clear embossing ink and then added Gold Embossing Powder. After I melted the powder with my heat gun, I coloured the image in with a Wink of Stella Glitter Pen in Gold. I fussy cut the image and popped it up on my white Snowflake embossed background with some foam squares. I cut the letters "noel" directly into my card base and then inset the gold letters for a clean look. More gold with some ribbon, a bow and star sequins finish everything off!
Of course more gold on the inside with the sentiment "Sparkle All the Way" sentiment from the New "Woodsy Christmas" collection.
Follow the High Hopes Stamps blog as the DT Divas will be bringing Daily Inspiration throughout the month. 

Thanks for stopping by today!
Happy Stamping!
Supplies:

Friday, October 26, 2018

Garden Window!

Happy Friday Ai Fans!
Today I am trying my hand at Watercoloring my cards using some Zig Clean Color Real Brush markers. I still need lots of practice but I have to admit how fun they are! I also wanted to show you a different way to use the "Garden Window MTF" stamp set. 
The Garden Window set is actually a set to make a Mini Try-fold card. Instead of creating a try-fold card, I decided to just use the main image and add a cute puppy from the "WC Dog set" peeking out the window. I started by stamping the window with Stazon Black ink on watercolor paper. I stamped it a second time on a post-it-note to create a mask so I could add the puppy in the window. Next I used my markers, a water brush and the Ai "Watercolor Palette" and watercolored my image. I added some Yellow Stickles to the flower middles for that tiny bit of sparkle.
I made a set of 3 coordinating cards and tied them together with some white ribbon. I think it'll make a nice gift. I actually used the sentiment from the Girlfriends "Bench" stamp set.
Zig Clean Color Colours Used:
Light Blue, Cobalt, Lilac
Yellow, Mustard, Beige
Deep Green, Light Green, Flesh Colour
Light Carmine, Light Pink
Dark Brown, Blue Grey

It's always fun to see how you can use your stamps differently then intended to get the most out of your sets!
Happy Stamping!


Supplies:

Tuesday, October 23, 2018

Snowman Stocking!

Hello HH & OCS Fans!
For today's card I am using the "Snowman Stocking" stamp from the new "Woodsy Christmas" Release over at High Hopes! I love making Christmas cards in non-traditional colours such as this pink and blue colour combo!
For my card design this week I am using paper from the Bo Bunny Little Wonders 6x6 collection. I stamped and coloured this adorable image with my Copic Sketch markers to match my Designer papers. I  love tilting a layer as it adds some interest to the card. Each Snowman's hat and the candy cane have some Crystal Stickles added to them.
More Designer papers and a scalloped border edge add a fun element to the inside. I used the HH "Season's Greetings" sentiment on the inside.
Copics Used:
C00, C01, YR04, YR09, R01, R24, R27
E27, E41, E42, E43, RV52, RV55
B34, B37, B39, N4

Thanks for stopping by and
Happy Stamping!

Supplies:

Friday, October 19, 2018

Too Cute To Spook!

Hi Ai Fans!
Halloween is just around the corner and I couldn't resist making one more card. This little Witch is just "too cute to spook" don't you think? My card today uses an image from the Art Impressions "Halloween Magic set". 
Look at the number of stamps and sentiments you get in this set! Great value, and think of all the combinations you can make!
I had these card bases left over from another project and put them to good use with the "Halloween Magic Set".
I used the Ai "Oval Double Stitched Dies" to cut my image out and make an oval frame to put her in.
Copics Used:
Skin: E00, E21, E11, R20
Hair: E23, E25, E29
Outfit: BV04, BV08, YR04, YR09
Cat: N4, N5, N7
Dot outline: 110, Y35, V17, YR16, FYG2

Thanks for stopping by today!
Happy Stamping!


Supplies:

Tuesday, October 16, 2018

Christmas Penguins!

Hi HH & OCS Fans!
I'm back today to share with you another super cute stamp from the New "Woodsy Christmas" Collection from High Hopes! Yesterday was "Gnomes" and today is all about Penguins LOL. This is the "Christmas Penguins" stamp. I love the little guy peeking around the big present, he's just too cute!
Today's paper layers are from the Echo Park " Celebrate Christmas" 6x6 collection! I love adding lots of layers of different papers and embellishments to my cards! The trim on the Santa hats is Liquid Applique, which you apply, let dry, then heat with your heat gun as you watch it pop up! You can't tell from the photos but I also added Spectrum Noir Clear Glitter pen to all the bow and ribbons. The sentiment is called "Happy Holidays".
I used the aHH sentiment called "Magic of Christmas" on the inside along with some more of the EP paper.
Copics Used:
N1, N4, N5, N7
R01, R24, R27, R29, R56
YG63, YG67, YG93, YG95, YG97
YR04, YR09

Don't forget to head on over to High Hopes or One Crazy Stamper to check out the New "Woodsy Christmas" Release.
Happy Stamping!

Supplies:

Monday, October 15, 2018

HH New Release

Happy Release Day HH & OCS Fans!
It's Release Day of the brand new "Woodsy Christmas" stamps from High Hopes Stamps! Wait until you see them all, they are so adorable!! I'm playing with the "Sledding Gnomes" image today!
I chose paper from the Echo Park "Merry & Bright" 6x6 collection and coloured my image to match. I love the sentiment "Gnome for Christmas"!
This is the new "Merry Christmas" sentiment.
Copics Used:
W1, W3, C1, C2, C3
R27, R29, R56, R81, R85
G43, G46, YG63, YG67
E01, E21, E95
B0000, B000

Saturday, October 13, 2018

Dracula!

Howdy DDS Fans!
Let me introduce you to "Dracula" from the Halloween/ Autumn  2018 Release over at Digi Doodle Studios! I know Dracula is supposed to be scary but I think this little guy is absolutely adorable!
I found a Coffin card base SVG file over at the Silhouette Design Store that was perfect for my little Dracula. Using my Silhouette Cameo I made the card and then mounted my coloured digital image to it. I used some Black Soot Distress ink on the coffin to give it some added dimension.
I popped my fussy cut image up with foam tape to the front of the card base. I love foam tape as it gives more dimension to your card.
Copics Used:
Skin: E00, E21, E11
Hair: N5, N7, N8, N9
Coat: N5, N7, N8/ R37 R39, R59
Pants & Vest: BV04, BV08
Bat & Tombstones: W3, W5, W7
Moon: YR21, Y35, Y38

Happy Stamping!
Supplies:

Friday, October 12, 2018

Style Is Everything!

Happy Friday Ai Fans!
Oh My Gosh!!!! I just absolutely Love "Dotty" by Art Impressions! Isn't she just a free spirit and the look on her face says it all..... She's in the zone!
My papers today on these two cards are from the Doodlebug "Hello" 6x6 collection. I used my Brother Cut Scan to fussy cut "Dotty" and then popped her up with foam tape for some dimension. A few Doodlebug Sprinkles and Diamond Stickles on her bloomers finish everything off. I also used the Ai sentiment called "Style Is Everything".
"Dotty" is from the Golden Oldies line of stamps! You should really check them out, there are some super cute and funny stamps in that category.
Copics Used:
Skin: E00, E21, E11, R20 RV04
Hair: N5, N7
Accessories: RV06, RV09

Happy Stamping!


Supplies:

Thursday, October 11, 2018

Art Impressions WTW Release and Tutorial!

Hello Ai Fans!
Today starts the New Release of the "Windows To The World" and Challenge "Add Embellishments"! I am using the new "Succulents Window". There are so many ways you can use these adorable little Window To The World stamps. I am choosing to put mine on an Easel Card using the Ai "Scallop Easel Die".
Ok..... Let's get started!!
To start, I gathered up my supplies then went ahead and stamped my image using Stazon Ink on Watercolour Paper.
I have to admit, I'm new to using these pens. I added a bit of the colour to the image and then using a water brush painted the colour around.
After I had my entire image coloured, I went ahead and did my die cutting. Using the Art Impressions "Square Double Stitched Dies", I cut out my image and also cut out a frame for my window. I cut two of the "Scallop Easel Dies".
You need to make a small cut on each of the tabs from the edge to the long perforated edge (halfway in).
The next step is to glue the 2 pieces together making sure to ling up the scalloped edges.
Now glue the two edge pieces to the centre of the card base. As you can see I tend to get a bit heavy with the glue LOL.
Now glue the triangle pieces together, this forms the stand part of your easel card. After that is dry you push the tabs down to give the stand stability. You can also glue the tabs together as well.
Kate has an awesome video showing how to put everything together. You can find it here.
I decided to add a piece of Designer Paper and coordinating cardstock to my card base. I just used the Easel die and cut the paper to add it. I added foam tape to my window frame to give it a bit of dimension on my card.
I glued my image inside the window. Now to the fun part...... embellishing my card. I added some matching sequins and cut out some of the cactus from my Designer paper.
Zig Clean Color Real Brush Pens Used:
Turquoise Green, Deep Green
Light Green, Pale Green
Wine Red, Carmine Red
Lemon Yellow, Bright Yellow
Light Brown
I must say it was fun colouring with this medium and will definitely be using it again soon!
Happy Stamping!