Sunday, December 22, 2019

Just A Note!

Hi!
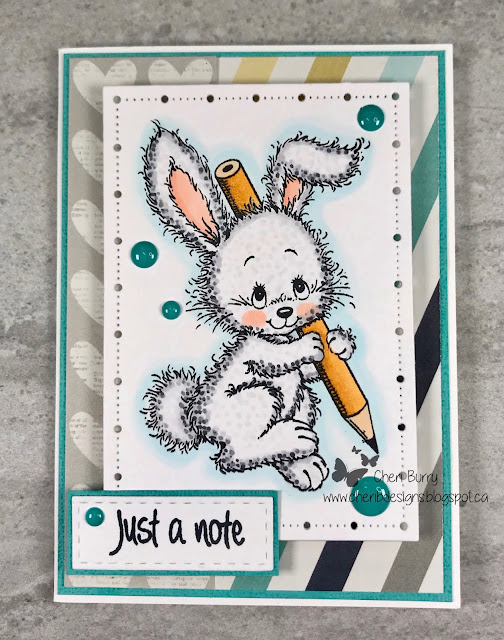
Just popping in today to share another cute set of cards made using the "Just A Note" set from Your Next Stamp. These bunnies are so sweet they just make me happy! I coloured each one using different techniques.
Although I coloured each Bunny different, I kept them consistent by using matching papers from the Simple Stories "Heart" 6x8 collection. I added Clear Glitter Wink of Stella to each pencil and some enamel dots on each card.
I decided to colour this bunny using a "stippling" effect. I took my Copic Markers and just added little dots in shades of grey. 
This little cutie is coloured using Copic Markers in the traditional way by blending the alcohol inks.
For this card I started by first colouring the bunny part of the image. Then I took some Copic Blending solution and a terry washcloth and dabbed it over the image to give it a furry look.
Copics Used:
White Bunny: C0, C1, C2, C3, C5, R01, R02
Grey Bunny: N1, N3, N4, N5, N6, R01, R02
Brown Bunny: E23, E25, E27, R01, R02
Pencil: YR21, YR23, YR24/ E30
Outline: B0000, B000

Happy Stamping!

Friday, December 20, 2019

Coffee with Friends!

Hello Friends!
I wanted to add some cards to my stash that I could send out to my friends to let them know I am thinking about them. It's always great to get unexpected mail! I know it sure puts a smile on my face and I want to return the favour! I am using the "Friends at First Sip" stamp set from My favourite Things (MFT).
I stamped and coloured my images and then using the matching "Friends at First Sip" Die set created these two cards. I am using paper from the Echo Park "Coffee" 6x6 collection.
For this card I created this card using a "window frame" and put my outdoor scene inside. I used light blue ink and the MFT Cloud Stencil to create the cloud background and then some grassy dies I had on hand. I gave each girl some polka dots with a white gel pen for a fun look.
I always love decorating the inside of my cards. For one, it uses up scraps of the papers I used on the front of my card and two it makes the whole card design feel finished.
This card is a simple layer of dies from the CDD Fancy Frames die set. The girls are popped up with foam tape for added dimension.
Of course I had to finish the inside of this card as well and add a different sentiment from the set.

See all the fun you can have with this set and so many choices.
Copics Used:
Skin: E00, E11, E21, R20
Hair: E23, E25, E27/ E30, E31, E33, E34, E35
Reds: R21, R22, R24/ R32, R35
Blue greens: BG01, BG02, BG72, BG75, BG78
Greys: N1, N2, N3, N4, N5, N6, N8/ C1, W1
Greens: YG93, YG95, YG97, YG99
Browns: E30, E31, E33, E34, E35, E37

Thanks for stopping by!
Happy Stamping!

Tuesday, December 17, 2019

Snowman Hugs!

Hello!
Thanks for stopping in today to see this cutie called "Gimme A Hug Snowman" from High Hopes Rubber Stamps! Snowmen are one of my favourite Winter/ Christmas images and this one is on my favourite list! I used to love going out with my kids, rolling those balls of snow and creating different "snow people"! We always had a blast and I loved that no two snowman ever looked alike. It was fun finding different things to decorate the snowman with and hot chocolate always followed!
I started my card by stamping the image and colouring it with Copic Markers to match the Designer Paper I chose. Today's papers are from the Doodlebug "Christmas Magic" 6x6 collection. My card has lots of layers using the patterned paper and matching cardstock. I added a little icicle border cut out of silver glitter paper for a fun touch! The sentiment is also from High Hopes and is called "Hugs & Hugs".
Copics Used:
C00, C0, C1
N5, N6, N8
YR04, YR09
R22, R24, R29
YG23, YG25
E43, E44, E47

Christmas is right around the corner and this is my last post here before the Holidays. I just want to wish all of you a very Merry Christmas and all the very best for the New Year! Enjoy your time with family and friends, making new memories!
Happy Stamping!

Friday, December 13, 2019

Polaroid Friends!

Hello!!!!
Oh My Gosh!!!! These "Squigdy's" are adorable! I mean come on, look at those cheeks! I just want to squeeze them all! This is the adorable "Squidgy Pals" set from Stamping Bella.
I had a crafty friend over the other weekend and She made a card with these YNS Stitched Polaroid Frame dies but with a different image. Boing.... a light went off in my head! Why not stamp these cuties inside the frames and create my card with them. I started with the larger frame, stamped 1 image, masked it off, stamped the next image, masked it off and then added the girl in the back. I admit it took me a few tries to get it right but when it did, boy did it turn out cute! And of course paper from the Doodlebug "Sunkissed" & "I Love Travel" 6x6 collections were just the fun and bright papers I needed for these cuties! Some twine and enamel dots finish everything off.
On the inside I used sentiments from the SSS "Thoughtful Messages" and "Tiny Words" stamp sets along with more of the Doodlebug papers.
Copics Used:
Skin: E00, E11, E21, R20
Hair: E50, E53, E55/ E31, E35, E57/ YR21, YR23, YR24, YR27/ N2, N3, N6
Red: R24, R27, E29
Blue: B02, B04, B06
Green: Y13, Y15, Y17
Yellow: Y13, Y15, Y17
Pink: RV11, RV13, RV14, RV17
Outline: W0, W1, W3, W4

Happy Stamping!

Tuesday, December 10, 2019

Penguin Kind Of Season!

Happy Tuesday!
Look at today's cutie!!! Isn't this penguin just the sweetest?!! This adorable image is called "Skating Along" from High Hopes Stamps! The expression on his face just makes me giggle! That's how I skate too all graceful (lol).... except because I'm not looking down, I'd trip and fall flat out LOL! 
To start I stamped the background High Hopes image called "Winter Wonderland Background" with embossing ink and added white embossing powder. Then I used my heat gun to melt the embossing powder. I stamped the background a second time on some masking paper and cut out the trees so I could lay it over the embossed image.  This way the trees would be "protected" while I coloured the sky. Using Distress Oxide Ink in Wilted Violet, Picked Raspberry and Broken China I created my sky and added ink to the snow. Next I used some Lucky Clover Distress Ink and my water brush to colour in the trees. I coloured the "Skating Along" image with my Copics and hand fussy cut it out. I added the image to the background with some foam tape for added dimension. Of course this background and image had to have some sparkle, so I used my Clear Glitter Wink of Stella pen and added it to the snow and the ice the penguin is skating on. A few enamel dots, ribbon and bow finish it all off!
I also used the High Hopes sentiment called "Sleetin' & Freezin'" and popped it up with foam tape as well.
Copics Used:
N0, N1, N4, N5, N7
YR04, YR09
RV02, RV06
V04, V06
B0000, B000, B01


For more inspiration using High Hopes Stamps visit out Facebook Group or the Blog! The Design Team is always busy creating amazing cards!
Happy Stamping!

Sunday, December 8, 2019

Happy Retirement!

Hello Friends!
I wanted to share with you a card I made for a client of Hubby's that was retiring after 34 years on the Police Force. This fellow was a Sergeant in the Forensics Department (like CSI) and was very highly thought of. I was at a loss as to what to create until I found this adorable set from Kate Hadfield Designs called "It's A Mystery". This is a digital stamp that comes from a bundle that includes more images and the other little objects on my card.
I know "Detectives" don't dress exactly like this but it was such a fun image and I loved the little images I made a collage with in the corner. I am using papers today from the Honey Bee Stamps "Great Outdoor" 6x6 collection. I downloaded the images I wanted, printed them on my printer and then coloured them in with my Copic Sketch Markers. After fussy cutting them out with my Brother Cut N Scan machine I popped them onto my designed card base. I also created the sentiment with my computer. I added Glossy Scents to his sunglasses, boots, and magnifying glass for a fun look. A bit of Clear Glitter Wink of Stella was added to the parts of the other objects as well.
Here you can see some of the dimension I added to the card using foam tape.
Here's the decorated inside with the second part of the sentiment I created on my computer.
Copics Used:
Skin: E00, E11, E21, R20
Hair: C2, C4
Coat and Hat: E31, E33, E34, E35, E37
Pants & Sunglasses: N5, N6, N8
Boots: C5, C6, C8, C9
Collage Objects:  E50, E51, E53/ YG95, YG97/ C1, C2/ Y02, R29/ N5, N6

Congratulations Rob on your Retirement! Thanks for your dedicated service to our Community and surrounding areas over the 34 years you worked for the Region!
Happy Stamping!

Friday, December 6, 2019

Keep Calm!

Hi!
Oh my gosh I just love this set of Ai Girlfriends! These Gals are always getting into some kind of trouble LOL. Today's card features the "Yoga Set" from Art Impressions!
I'm using an older pad of Designer paper today called " Birthday Wishes" from Echo Park. I tried to colour my images with the same colours that could be found in the 6x6 pad. I made the window frame using the Art Impressions "Square Double Stitched Dies". I cut 2 sizes inside each other to create the frame and popped the outside up with some foam tape. Then I inset my coloured image to complete the framed window look. Although you can't tell from the photos, there is some Clear Glitter Pen on various parts of the images for a sparkly look. A nice big bow and some matt enamel dots finish off my card.
Here's the decorated inside using another sentiment from the "Yoga Set".
Copics Used:
Skin: E00, E11, E21, E20
Hair: N3, N5, N6/ YR23, YR24/ E23, E25, E29
Pinks: RV13, RV14, RV17, FY1
Yellows: Y21, Y23, Y26
Oranges: YR12, YR14, YR16
Blue Greens: BG10, BG11, BG15
Shadow & Outline: W0, W1, W2/ B000


Tuesday, December 3, 2019

Joy To The World!

Happy Tuesday!!
Wow it's the December..... where did the time go? Soon it will be Christmas! This is the super cute High Hopes stamp called "Mudzie & Chopper's Caroling". This image brings back memories of Christmas Eve for me. Every Christmas Eve we would go to my Aunt & Uncle's house where Santa would make an appearance, the kids would sit on his lap and Santa would give us a small gift. My cousins and I would be thrilled that Santa had time to stop and say hello on his busiest night of the year. After some goodies we would all go out Christmas Caroling around the neighbourhood. It's something that isn't done that much anymore but it was so fun to entertain the various neighbours and was a family tradition I cherish!
Today I chose papers from the Recollections "Mistletoe Kisses" 6x6 collection. I coloured my image with my favourite Copic Sketch markers, added a paper pieced scarf to Mudzie and fussy cut the image out. I cut a piece of Designer paper using a die from the Gina Marie Double Rope set and then created a little scene with the lamp post and snow hills. I also used the High Hopes "Joy To The World" sentiment and whenever I look at this card, in my head I'm singing the song along with Mudzie & Chopper LOL. I added the Musical Notes die from Memory Box to go along with the caroling theme. A bit of Crystal Stickles on the book and Mudzie's boots as well as a few enamel dots finish off my card.
Here you can see the added dimension by popping up the scene layer, Mudzie & Chopper, the sentiment and one of the snow drifts with foam tape. I love adding extra dimension to my cards, I think it just makes them look that much better!
Copics Used:
Mudzie: W1, W3, W5/ E42, E43, E44, E47, R01/ N5, N6, N8
Chopper: E15, E17, E18, E19/ G24, G28
Crate: E50, E51, E53

For more inspiration using High Hopes Stamps visit out Facebook Group or the Blog! The Design Team is always busy creating amazing cards!


Sunday, December 1, 2019

Holiday Wishes!

Happy Sunday!
Look at these cute little chicks from the Stamping Bella "Santa Chick and His Helpers" stamp set! They are just so sweet and so easy and fun to colour up!
This card was fun to create and came together really quickly! I coloured the chicks up with my Copic markers and then used the "Santa Chick and his Helpers" matching die set to cut them out. Next using the MFT Stitched Window Panel and paper from the Polkadoodles "Ho Ho Ho" 6x6 collection created my card design. I popped the frame up with foam tape and inlaid the Ho Ho Ho paper. Everybody has a bit of Stickles on them for a fun sparkly look.
Here's the decorated inside using the sentiment that came with the stamp set.
Copics Used:
Yellows: Y35, Y38
Red: R24, R27, R29
Green: Yg17, YG23, YG25
Pink: RV04, RV06, RV09
White areas: C00, C1

Thanks for stopping by today!
Happy Stamping!