Thursday, February 20, 2014

February Card Kit

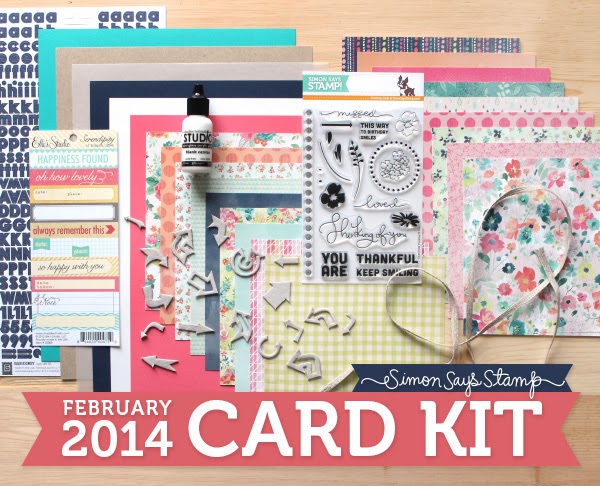
A few days ago I received my February card kit in the mail from Simon Says Stamp! It was a little late coming but Wohoo, I love getting things in the mail that aren't bills LOL.

  February Card Kit
Click the image to see Simon Says Stamp Card Kits
Today I had a bit of time so I got the kit out and created these two cards from the stamps and papers. I must say I am impressed with the kit and all that it contains. The papers, stamps and embellishments are very good quality. 


 I left the inside of the cards mostly blank, stamping a few flowers in the corner. This way it leave a nice amount of space so you can write a note to that special someone.  


I can't wait to get March's kit in the mail and see what I can create with it! My Nephew is coming for the weekend and I am so excited! He's a great kid and we will have a blast. Have a great weekend and chat at you later!
Cheri

Wednesday, February 12, 2014

My Last Valentine Card!

I made this cute card for my "sistah". It seems fitting that I used one of the Uptown girl stamps from Stamping Bella. This stamp is named "Uptown Girl Claudia Has a Candy. I changed her big Sucker into a heart for Valentine's Day. I'm part of Da Sistahood, are you?


Lots of love to everyone for Valentine's Day! Oh and hey ma sistah I love you tons, you mean everything to me!
Chat at you later,
Cheri

P.S. I entered this card in Bellariffic Friday Sketch Challenge


Tuesday, February 11, 2014

I've Got Another One

So I've been a bit busy crafting the last few days and I'm so happy that I've had the time to do so! Here's another Valentine Card I created. As you can probably tell I absolutely adore the Magnolia line of stamps! Sometimes it takes me a while to figure out the layout of a card but this one just came together no problem!


I entered this card in the Tilda's Town Challenge #91

Inside of Card


  • I made a 5 1/2" square card from Gemstones cardstock in pink diamond, then I started my layering. 
  • I used a piece of patterned paper from the Bo Bunny Crush Collection cut at 5 1/4" square as my first layer.
  •  I had a scrap piece of pink dotted paper that I used for my second and fourth layer cutting it with my Cuttlebug and 2 dies from the Spellbinders Decorative Layers 22 set. 
  • The third layer is cut from Spellbinders Label 22 set. 
  • I always like to take Tim Holtz distress ink and ink the edges of my layers as it seems to add a nice dimension to the project. 
  • I cut hearts from the Die-namics Heart Stax to use on the outside and the inside of the card as well. 
  • Using a piece of the pink diamond paper I ran it through the Cuttlebug using the Die-namics Sentimental Flourish and then cut it in half.
  •  I also made a small border for Tilda to lay on from the Die-namics Layered heart border. 
  • I glued the Bo Bunny paper, doily and the cut flourish together Taking the pearls I weaved them through the lace and then added them onto the paper. I then glued that paper set onto the card base. On the remaining 3 layers I used hexagon pop dots from The Sticky Stuff Store to layer and add more dimension to the card. Glue the heart border to the card.
  • I stamped XO on the small heart and heat embossed the inked image. Using pop dots again I added it to the card.
  • I stamped the Magnolia "Tilda with dot bow" onto Copic paper and coloured her with my markers.
    • Skin: E000, E0, E01, R20
    • Clothing: R81, R83, R85, R89
    • Heart: R83, R85, R89
    • Hair: E33, E35, E37, E39
  • Fussy cut out the image and glue her to the heart border.
  • I added Stickles in Crystal to the heart, her cuffs and the dots on her hair band
  • I think the inside of the card speaks for itself, just another Bo Bunny paper, hearts and a sentiment stamp.
I think Tilda turned out adorable and will be much loved by her recipient. (can't tell you who as they follow my blog "wink"). One more to make and then that's it for this year, whew! Have a great evening.
Chat at you later,
Cheri

Monday, February 10, 2014

Another Class Review Went Live


Hello everybody!
 Another one of my class reviews from The Art Studio at SNR went live. I took Dena Concienne's class How to Make a Pull and Tuck card. Dena's classes are wonderful! So head on over and check out my review!


Click here to see the review!    Cheri's review

Thanks everyone and chat at you later!
 Cheri

Valentine Card


I made this Valentine card for my Nephew. I always struggle to make cards for "guys". I tried to use darker colours so that the card wouldn't look too "girly", after all he is almost 13 so you do have to be careful (LOL).  I am so used to embellishing my cards and when you are creating for a masculine theme I always think the card looks too plain. I like how this one turned out though and I think He will love it too.
Supplies Used:
C.C. Designs Hogs & Kisses Stamp
Kraft Card Stock
Black glitter card stock
Red ink
Black Ink
Heart stamp
Red Stickles (on the arrow)
Glossy Accents (on the wings)
Red and Black twine
Copic Markers W7, W5, W3, W1, W0, R01, R29, B0000

One of my other New Year's Resolutions is to try to enter in some of my cards into different challenges from some of the blogs that I follow. I am going to try to enter this card in one of the challenges for fun. Gotta run get Hubby's supper going!
Chat at you later,
Cheri


Sunday, February 9, 2014

Altered Clock

One of my favourite artists Christy Tomlinson showed a tutorial on how to make an altered Tim Holtz clock. I fell in love with it and I decided to give it a try as well. Christy's store Scarlet Lime was out of the clocks, so I decided to check my local Thrift Store to see what I could find. I found these 2 children's alarm clocks for $2.99 and $3.99.
I TURNED THESE


INTO……….

I think they turned out super cute! I made them to give my "favourite girls" for Valentine's Day! Now it sure would have been easier to use the alterable clocks from Tim Holtz that are empty,  but I am proud of how I improvised and made these adorable clocks. I am going to try to give you step by step instructions how I made these clocks. I will just show the purple clock instructions so you don't get too bored LOL.
Ok so here we go:


1.   I took a small screwdriver and removed the back of the clock, removing everything from the inside. I also took off the legs and bells. Remove the glass and set it aside.
2.   Because I needed the back piece of the clock to be flat, I had to use the pliers to remove any of the plastic that was sticking up.  (battery case etc)


3.   I sprayed painted the clock and bells inside and out, allowing them to dry completely
4.   I used the black back of the clock and cut out a cardboard circle. Use Gesso to prepare the surface of the circle.
5.   I used Christy Tomlinson's She Art coffee filter words and my homemade modge podge to cover the circle.
6.   Once it was dry, I used Gesso again and covered the paper with another coat, to give it a washed out look.


7.   I then sprayed the circle lightly with Heidi Swapp mist and using a paper towel dabbed pink paint  all over the circle, adding layers.
8.   I tinted some Modelling Paste with my paints to match my theme colour.
9.   I taped down the clock face stencil so it wouldn't move while I was applying the coloured paste.
10. Using a spreader tool I applied the paste all over the stencil, covering it completely. Gently lift the stencil off the cardboard circle and let it dry completely.

    
11. Using purple paint I painted the small wooden bird house and then decided to add a darker colour to the roof for more of a contrast.
12. I used my Cuttlebug and cut out a banner from cardboard and patterned paper. Glue the paper banner to the cardboard banner. I used cardboard to make the banner stronger
13. I used clear embossing ink and stamped "love" on the banner and embossed it with purple embossing powder.

14. I still wasn't happy with the birdhouse so using Washi tape I covered the roof with it as well as a strip on the bottom. I took Perfect Pearls and added a pearl border to the front of the roof as well.
15. Using the same patterned paper I covered a chipboard heart, added a "U" to it and then used purple stickles to make the U pop.
16.  I wanted to add more dimension to the circle so I made a custom colour with 3 of my paints. I then used a flower stencil and added a random flower pattern. Perfect pearls for the centres completed the look.
17.  Put the legs, bells and glass back in the clock. I took spanish moss and glued it to the inside
bottom of the clock. I adhered the banner to the circle, using pop dots to add even more dimension. Glue the birdhouse in and the heart. I then glued the finished cardboard circle to the inside of the clock.


18. I cut out another cardboard circle to cover the back of the clock up. (to hide the holes). I took some of Christy Tomlinsons' Doodles Art Coffee Filter Sheets and glued them on.
19.  I used another stencil and stencilled a design onto the back for added interest and cover the holes.
20.  Glue the circle onto the back of the clock and then glue the entire piece onto the clock. I then added a small bird to each of the clocks on one of the bells and embellished the other side with ribbons or flowers.


Once again I have to say I am happy with my finished results and I know the girls will love them!
That's all for now, if I get really brave I am going to try to do a video tutorial. I might even get a few more Valentine cards done tomorrow to show you!
Chat at you later!
 Cheri


Saturday, February 1, 2014

My new Website!

Thanks to my very talented and awesome daughter Taylor she made me a really awesome website ! You have to check it out!

Go to: cheribdesigns.net

Let me know what you think!
Chat at you later!
Cheri

Wednesday, January 29, 2014

Valentine Card #4


I had a bit of time today so I made another Valentine card! This card is 5.5 x 5.5" and made with paper from the very cute Doodlebug Sweetheart 6X6 paper pad. Doodlebug has such cute papers! I also used the C.C Designs Hogs and Kisses stamp, which I think is so adorable.


Doodlebug Sweetheart 6x6 Paper pad
Die-namics Heart Die
Die-namics Heart Border Die
Die-namics Fishtale Stack Die
Beacon 3-in-1 Glue
Tim Holtz Distress Ink in Victorian Velvet
Crystal Stickles
Copic Markers


Paper for Copic Markers
Pink Pearls
C.C. Designs Hogs and Kisses Stamp Set
May Arts Textured Two Tone Ribbon
Memento Tuxedo Black Ink
Heart Doily


I coloured the image with Copic Markers
Pig: R81, R 83, R85
Feet: W1, W3, W5
Arrow: RV19
Shadow: B0000


Since the card is 5.5 x 5.5" square, I cut the pink card stock 5.5 x 5.5". Next I cut the flowered paper at 5 1/4 x 5 1/4"to create a layered effect. I cut the other 2 patterns at 5 1/4" and then cut diagonally to make 2 triangles. I cut 2 strips with the heart border die out of the pink paper and a coordinating patterned paper.  I inked the edges of the doily and the sentiment with distress ink. Glue all the pieces together, attach the ribbon and then adhere all to the pre-made card front. I used foam squares to make the image stand out a bit adding dimension. Place your pearls in the top right corner of the card. On the inside I cut 2 sizes of hearts from the patterned paper as well as one heart and stamped a valentine sentiment. After gluing those on I stamped another image of the pig in the bottom right hand corner. Now sit back and look at your cute Valentine card that you just made!

Chat at you later,
Cheri

Sunday, January 26, 2014

Wire Ring Journal


Here's a cute journal book I made. Once again one of items I had to have and have hardly used, the Zutter Bind It All. I decided to pull it out along with the chipboard albums covers I have stashed away and make something with this stuff for a change. I also wanted to use up some of my scrapbook paper. You know the kind you buy when you are first starting out in the crafting world. The big huge pads and then later on realize you won't use half of the designs in it lol. Although I like the papers for this project they are not a colour scheme I usually use for card making.I decided to use the chipboard cover 7 1/2 x 5" from Zutter. Not a huge journal but great for writing or saving smaller mementos. 


So here is the step by step:

  1. I picked out about 10 sheets of 12x12 matching papers and cut them to 7 5/16 x 4 7/8" in size.
  2. Take the Bind It All machine and follow instructions to punch 13 holes in the paper.
  3. I took 1 sheet of 12x12 matching paper and cut 2 pieces 7.5 x 5 1/8 ". I cut it a bit bigger than the 5 inches to allow for wrapping around the edge of the chipboard piece. I then glued the paper onto the chipboard.
  4. Taking the Bind It All machine I followed the instructions for making a cover and punched 13 holes into it.
  5. Thread the wire into the punched holes "bind" your book with the Zutter machine, and voila and you are done!
You can decorate the outside cover if you wish. I decided not to do that until I decide what I want to do with this wire ring book.

That's about it for this project. Now onto more Valentine card making! 
Chat at you later!
Cheri