Wednesday, December 30, 2020

Welcome Little One!

Hi!
I was looking through my card stash and realized I was getting low on "Baby Cards". I thought this digital image called "Duck Family" from Kinda Cute By Patricia Alveraz would make the perfect and adorable baby card! But it would be perfect for Mother's Day too!
I downloaded, sized and printed the Duck Family onto Copic friendly paper. Taking my Copic Sketch markers I coloured the image in. I used a Gina Marie Double Roped Circle die to cut out my image and popped it up with foam squares for added dimension. My papers today are from the Doodlebug Special Delivery 6x6 collection. Some enamel dots and the HH sentiment "Welcome Little One" finish off my card. 
Copics Used:
Y21, Y23, Y32, Y35, Y38
YR04, YR07, YR09
B0000, B000, B00

This is my last post for Kinda Cute! I have throughly enjoyed my time with them! Patricia is a sweetheart and her images are adorable! Thanks Patricia and fellow KC Designers for an amazing experience with all of you!
Don't forget to head on over to the Kinda Cute By Patricia Alvarez Face Book group for more inspiration, or check out the etsy shop!

Happy Stamping!


Tuesday, December 29, 2020

Snowman Greeting!

Hello!
Well.... Christmas is over and I hope you had a great one. This year was different for everyone but hey we made it through it right!! Today I'm sharing the last Christmas card I made for this year. It's already been sent out of course but I wanted to show it to you anyway as it's so cute! Meet the adorable "Hartley Framed Snowman" from High Hopes Stamps! Hartley doesn't have to be just for Christmas, He would make an adorable winter themed card as well!
I stamped my image onto Copic friendly paper and then coloured Hartley in with my Copic Sketch markers. I wanted a fun bright card so I used papers from the Doodlebug Frosty Friends 6x6 collection and picked markers to match the papers. Once that was finished, I cut out the image and backed it on the polka dot paper. Some fun layers and matching cardstock is my simple design today. I added some clear glitter pen to the hearts and stars but it's hard to see in the picture. Matching enamel dots finish everything off.
On the decorated inside of my card I used the "Snowman Greetings" sentiment also from High Hopes.
Copics Used:
C00, C0, C1, C3, C6, C8, C9
R01, R22, R24, R27
V04, V05, V06, V09
B21, B24, B28
BG000, BG10, BG11, BG13, BG32, BG34
YR04, YR07, Y11, Y13, E23, E27

Thanks for stopping by today and don't forget to head on over to the High Hopes website and see all Lora's adorable stamps! You can find more inspiration from the Design Team by visiting our Blog and Facebook page too!
Happy Stamping!


Wednesday, December 23, 2020

Some Sassy Cheryl Fun!

Happy Hump Day!
I pulled out some older digi's I had from Sassy Cheryl's and had a blast creating these cards! All have different images but I stayed with the same colour scheme. These would be great for Christmas cards or you could send them out in the New Year to celebrate Winter.
`
Today I am using a combination of papers from the Photoplay "Kringle & Co." and "Christmas Cheer" 6x6 collections. I downloaded, sized and printed my images onto Copic friendly paper. Then I went about colouring them all with my Copic markers. Each card has polka dots added using a white gel pen and some sparkle with Crystal Stickles.
This cutie is called "Bashful Betty the Snowman". I added a ribbon tie and snowflake to finish this one off.
"Hanging With Friends" is what this digi is called. He just melts my heart!
I love this snowman called "Cold Hands Warm Heart"!
Nothing cuter than "Blinkies Snow Day Dreaming"!

Christmas is around the corner so I want to wish you all a very Merry Christmas and a Happy Holiday Season from my "bubble" to yours! Thanks for stopping in today!
Happy Stamping!


Sunday, December 20, 2020

Christmas Cheer!

Howdy!
Today I made a card using the MFT "Christmas Cheer" stamp set. I just thought these little critters were so cute I just had to have the stamp set! 
To start, I made a Distress Oxide Ink sky using the colours Cracked Pistachio, Broken China, Mermaid Lagoon and Tumbled Glass. Then I stamped the images and coloured them in with my Copic Markers. I added some MFT Stitched Snowdrifts to the bottom of the stamped hills and using a black marker, edged the hills so they matched the black ink lines of the snowy hills from the set. I hand fussy cut out my images and popped them up with foam squares for added dimension. Some glitter was added to various elements using a Spectrum Noir Clear Glitter Pen.
I added the bunny and another sentiment on the inside for a fun surprise!
Copics Used:
Trees: G28, YG17, YG23, YG25
Racoon: E08, E09, E93, E97/ W00, W0, W1
Cardinal: R37, R39, R59/ YR04/ C4, C6
Bunny: E30, E31, E33, E35
Fence & Stumps: E25, E27
Snow Highlight: C00, C0, C1, Copic 0
Reds: E35, E37, E59
Yellows: Y35, Y38

Happy Stamping!


Friday, December 18, 2020

Snowman Love!

Hi!
I'm still working away on some Christmas cards. I've sent out more than usual this year which is due to the Pandemic. I just want to send some cheer out to all our family and friends. These adorable snowmen are from Miss Daisy Stamps. I've had these digi's for quite a while and thought they needed some colouring love!
This snowman is adorable and simple to colour! Sometimes fast and simple is just what you need to get those last cards done. That doesn't mean that the simple design takes away from making an adorable card. I decided to use papers from the Doodlebug (my favourite company) "Winter Wonderland" 6x6 collection. I added a MFT "Icicle Border" die to each card in glitter paper. All the pom poms have Stickles on them as well as the buttons. A cute bow and some enamel dots finish off my cards.
The sentiments are also from Miss Daisy and match this cute snowman perfectly
I tried to find links for the stamp and sentiments but I didn't have any luck, so I'm thinking maybe Miss Daisy is no longer. That happens when you hoard your craft items and don't use them LOL.
Copics Used:
Snowman: C00, C1, C2, C3, C4, R01, Copic 0
Hearts: R24, R27, R29
Pinks: RV17, RV19, RV66/  RV52, RV55
Blue Green: BG53, BG57
Blue: B21, B24, B26/ B000
YR04, YR07, C6

Thanks so much for stopping by today! I hope you have a great day!
Happy Stamping!


Wednesday, December 16, 2020

It's Picture Time!

Hello!
I love this adorable digital image called "Snowman Taking Photo" by
 Kinda Cute By Patricia Alveraz! Sometimes we all need that "fast" design and this image is so cute and easy to colour, your card can come together quickly if need be!  
I'm using papers today from an older Bo Bunny 6x6 collection called "Snowfall". I love the brown and blue combinations in this collection and have been hoarding it LOL. My Design is simple with just 1 main paper layer and one strip. I coloured and cut the image out with an oval die and put a snowflake behind the die cut (Thanks Donna *wink*) Some ribbon, a bow and enamel dots finish off my card.
The sentiment is  from the "Christmas Sentiments" digital stamp collection also by Kinda Cute By Patricia Alveraz.
Copics Used:
C00, C0, C1, C2, C3, C5, C6, C7, C9
B95, B97, B99
E27, YR04, YR09
B0000, B000

Head on over to the Kinda Cute By Patricia Alvarez Face Book group for more inspiration, or check out the etsy shop!

Happy Stamping!


Tuesday, December 15, 2020

Candy Cane Wishes!

Happy Tuesday!
I've said it before but whenever I see a Penguin it reminds me of my Grandma. She was such a special lady and meant the world to me! Grandma was my Maid of Honour and she was tickled pink to stand with me! So of course when I saw the High Hopes "Top Hat Penguin", I knew I had to make a card with it! I decided to pair it with the "Birch Tree Background" stamp.
I started by first stamping the penguin. I stamped it a second time on some masking paper, fussy cut it out and placed it over top of the first stamped image. This allowed me to now stamp the background over the penguin to look like it was all one stamp. I coloured it all in with my Copic Sketch Markers. I held my breath and using a Marvy Deco Just Premium Marker in silver added tiny dots all over to look like snow was falling. Whew it turned out LOL,  and I didn't have to do it all over again. I backed the image with some papers from the Bella BLVD "Santa Squad" 6x6 collection. The sentiment is also from HH and is called "Candy Cane Wishes 2". Some twine and bows finish off my card.
Copics Used:
Penguin: C00, C1, C5, C7, C8/ Y23, Y26
Trees: W1, W3, E50
Greens: YG63, YG67
Reds: R32, R35, R37, R39
Hills: C00, C0, C1

Thanks for stopping by today and don't forget to head on over to the High Hopes website and see all Lora's adorable stamps! You can find more inspiration from the Design Team by visiting our Blog and Facebook page too!
Happy Stamping!


Saturday, December 12, 2020

Christmas Mermaid!

Hi!
I haven't made a shaker card in forever!!! When I saw this cute digital stamp called "Christmas Mermaid" from Kinda Cute By Patricia Alveraz, shaker popped into my head! I love the idea that mermaids are making snowmen under the sea!
I started my design today by downloading, sizing and printing off the mermaid image. Next I coloured her in with my Copic Sketch markers. I made a frame out of a Stitched Scallop die and a circle die. I cut the coloured image out with a slightly bigger circle die so that I could mount the frame on top. Taking some acetate, I made a "window" and glued it to the back of the frame. I took some doubled up foam tape and added it to the back of the frame I created. Next I added an assortment of sequins and tiny beads and then glued the image to the frame. My papers today are from the Photoplay "Gnome For The Holidays" 6x6 collection. 
Here you can see how the scalloped frame is popped up. Shaker cards are always so much fun especially for younger kids when the skate, shake, shake them LOL!
Copics Used:
Skin: E00, E21, E95, R20
Hair: Y21, Y23, Y26, Y28
Reds: R24, R27, R29
Tail: G00, G02, G03, G5, G7, G9, G14, G28
Snowman and Sand: E30, E31, E33, E34,  E37, E49
Water: B0000, B000, B00

Head on over to the Kinda Cute By Patricia Alvarez Face Book group for more inspiration, or check out the etsy shop!

Happy Stamping!


Thursday, December 10, 2020

Holiday Penguins!

Hi!
I wanted to share this adorable slimline card with you today! I decided to use the MFT "Holiday Penguins" to create this adorable little winter scene.
I made my slimline card base (81/2" x 3/12") with some red glitter paper from Lawn Fawn. I cut a piece of cardstock using a Gina Marie "Scalloped Stitched Slimline" die. Next I taped the die cut to my blending mat covering up the scalloped edges to keep them white. Now I set about blending Distress Oxide Ink in Blueprint Sketch, Evergreen Bough, Broken China and Black Soot to make a dark winter sky. I coloured in the stamped images and using my Brother Cut N Scan, cut them out. I hand cut the snowy hills and added some Distress Oxide Ink in Iced Spruce to the edges and in just a bit. Now all I had to do was place my images. I popped them up with foam squares for added dimension to my card. Of course I had to add some glitter using my Stickles and a clear glitter pen. I stamped the sentiment from the set onto the bottom of the hill and I was finished.

Here's the finished inside using another sentiment from the "Holiday Penguins" Stamp set.
Copics Used:
C00, C0, C1, C6, C8, C9
R01, R37, R59, R89
YR21, YR24
G28, YG17, YG23, YG25
E23, E25, E27

Thanks so much for stopping by today! I always appreciate that you come to take a look!
Happy Stamping!


Tuesday, December 8, 2020

Gingerbread Family!

Hello!
I'm popping in today with an adorable card made with the High Hopes image called "Gingerbread Family In Heart"! I've fallen in love with the Gingerbread designs Lora has in the shop! They all are absolutely adorable and this family is one of my fav's!
To start, I stamped the image onto Copic friendly paper and coloured the image to match the papers in the Photoplay "Not A Creature was Stirring" 6x6 collection. Then taking a stitched heart die, cut out the image. I popped the image up with foam squares for added dimension. I used the HH "Gingerbread Dreams" sentiment. Some ribbon, a bow, gingerbread gem, enamel dots and Stickles finish off my card.
Copics Used:
E33, E35, E37
Y23, Y26, BG75, BG78
R35, R37, R39, R22
G28, G07, G05
RV04, RV52, RV55
BG000, BG18, BG45, BG49, BG57, BG75, BG78

Thanks for stopping by today and don't forget to head on over to the High Hopes website and see all Lora's adorable stamps! You can find more inspiration from the Design Team by visiting our Blog and Facebook page too!
Happy Stamping!


Sunday, December 6, 2020

Christmas Gnomes!

Happy Sunday!
I totally forgot I got this stamp set last year in a Simon Says Stamp Card kit! So what a nice surprise when I found it in my "Christmas bin".  Meet the adorable Gnomes from the "Gnome For the Holidays" stamp set! Love the Gnome dressed as a Christmas tree.... just cracks me up!
Simple design today.... I just stamped the Gnomes onto a piece of Copic Friendly paper and then stamped the snowflakes randomly with blue ink. Next I coloured in my images and added crystal gems to the snowflake centres. I used the "Merry Christmas" sentiment from the set as well. A bit of Stickles added to the Santa Hats adds a fun touch.
This card is has more traditional colours and a piece of paper from the Polkadoodles "Ho Ho Ho Christmas" collection.
This card has a more fun vibe as I used non-traditional colours. A piece of paper from the Doodlebug "Fairy Tales" brings it all together.
Copics Used:
Skin: E00, E11, R20
Beard: C0, C1, C2
Traditional card
YG93, YG95, YG97
Red: R24, R27, R29
Non-traditional Card:
YG21, YG23, YG25
BV08, V15, V17
RV04, RV06, RV09, RV63, RV66
BG53, BG55, BG09
Y35, Y38

Thanks for stopping by today!
Happy Stamping!


Saturday, December 5, 2020

Let's Bake!

Happy Saturday To You!
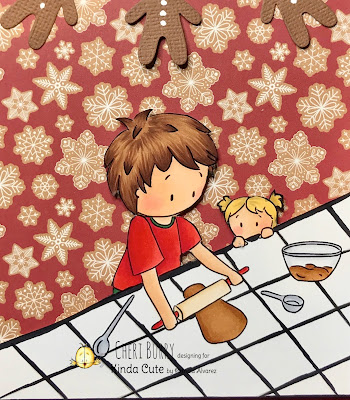
I love Saturdays as it's a "no work zone" in my house and Hubby and I spend the day together.  I love this adorable "Boy Baking" digital stamp from Kinda Cute By Patricia Alveraz! When the kids were little, Saturdays often meant we baked something to snack on for the weekend! So this reminds me of those family times together!
I started by downloading, sizing and printing the digital image onto Copic friendly paper. I coloured the image in with Copic Markers and then fussy cut the image out. I added some black lines to try to make it look like a tile countertop. I added the image to my card base that used paper from the Echo Park "A Gingerbread Christmas" 6x6 collection! A cute gingerbread banner finishes off my card.
Copics Used:
Skin: E00, E11, E21, R20
Hair: E23, E25, E27, E29/ Y23, Y28
R24, R27, R29
Gingerbread: E33, E35, E37
Utensils: C0, C1, C3/ E51, E53, R27

Head on over to the Kinda Cute By Patricia Alvarez Face Book group for more inspiration, or check out the etsy shop!

Happy Stamping!